Spring 트랜잭션[@Transactional]

스프링에서 트랜잭션을 관리할 때 @Transactional이 거의 필수적으로 사용된다.
따라서 @Transactional에 대해 정확히 알고 사용하는 것이 매우 중요하다!
@Transaction은 사용하면 핵심 비즈니스 로직과 공통기능 (로깅, 트랜잭션, 보안 등)을 분리하여 코드 재사용성과 유지보수성을 높이는 AOP (Aspect-Oriented Programming, 관점 지향 프로그래밍)를 활용하여 트랜잭션을 자동으로 관리해주는 선언적 트랜잭션 관리 방법이다.
<순수 JPA만을 사용한 트랜잭션 관리>
@Service
public class OrderService {
    private final EntityManager entityManager;

    public OrderService(EntityManager entityManager) {
        this.entityManager = entityManager;
    }

    public void placeOrder(Order order) {
        EntityTransaction transaction = entityManager.getTransaction();  // 수동 트랜잭션 시작
        try {
            transaction.begin();  // 트랜잭션 시작
            entityManager.persist(order); // 엔티티 저장 (INSERT 실행)
            transaction.commit();  // 트랜잭션 커밋
        } catch (Exception e) {
            transaction.rollback();  // 예외 발생 시 롤백
            throw new RuntimeException("주문 실패", e);
        }
    }
}
스프링을 사용하지 않고 트랜잭션을 관리할때는 직접 코드로 시작(begin()), 커밋(commit()), 롤백(rollback())을 넣어줘야 한다.
<@Transactional을 사용한 트랜잭션 관리>
@Service
public class OrderService {
    private final EntityManager entityManager;

    public OrderService(EntityManager entityManager) {
        this.entityManager = entityManager;
    }

    @Transactional  // 트랜잭션 자동 관리
    public void placeOrder(Order order) {
        entityManager.persist(order); // 트랜잭션 시작 & 엔티티 저장
    }
}
@Transactional을 사용할 경우 자동으로 트랜잭션 시작, 커밋, 롤백을 관리해준다.
따라서 비즈니스 로직에 트랜잭션과 관련된 복잡한 로직들이 없어지면서 코드가 간략해지며 개발 생산성이 증가하는 효과를 얻을 수 있다.
@Transactional의 동작 원리
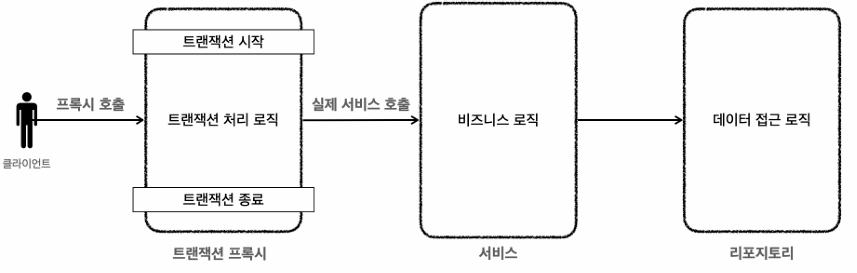
@Transactional을 사용하게 되면 작성한 비즈니스 로직에 생략했던 트랜잭션 관련 기능들이 추가된 프록시가 생성되게 된다.
public class TransactionProxy {
 private MemberService target;
 public void logic() {
 //트랜잭션 시작
TransactionStatus status = transactionManager.getTransaction(..);
 try {
 //실제 대상 호출
          target.logic();
          transactionManager.commit(status); //성공시 커밋
        }
catch (Exception e) {
          transactionManager.rollback(status); //실패시 롤백
throw new IllegalStateException(e);
        }
    }
 }
@Transactional의 프록시 동작 과정
1️⃣ 클라이언트가 @Transactional이 적용된 메서드를 호출
2️⃣ Spring AOP 프록시 객체가 먼저 실행됨 (원본 객체를 직접 실행하지 않음)
3️⃣ 프록시가 트랜잭션 시작 (begin())
4️⃣ 원본 메서드 실행
5️⃣ 예외 발생 여부 확인
예외가 없으면 commit(), 예외가 발생하면 rollback()
6️⃣ 클라이언트에 응답 반환
@Transactional 주의사항
1. 프록시 내부 호출
@Slf4j
@SpringBootTest
public class InternalCallV1Test {

    @Autowired CallService callService;

    @Test
    void printProxy(){
        log.info("callService class={}", callService.getClass());
    }

    @Test
    void internalCall(){
        callService.internal();
    }

    @Test
    void externalCall(){
        callService.external();
    }

    @TestConfiguration
    static class InternalCallV1TestConfig{
        @Bean
        CallService callService(){
            return new CallService();
        }

    }


    @Slf4j
    static class CallService{

        public void external(){
            log.info("call external");
            printTxInfo();
            internal();
        }

        @Transactional
        public void internal(){
            log.info("call internal");
            printTxInfo();
        }

        private void printTxInfo(){
            boolean txActive = TransactionSynchronizationManager.isActualTransactionActive();
            log.info("tx active={}", txActive);
            boolean readOnly = TransactionSynchronizationManager.isCurrentTransactionReadOnly();
            log.info("tx readOnly={}",readOnly);
        }

    }
}
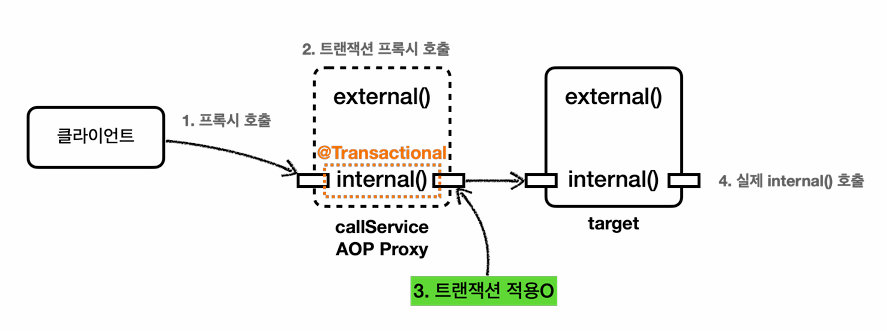
위 코드에서 @Transactional이 붙은 internal()를 직접 호출하면 트랜잭션이 잘 적용된 것을 확인할 수 있다.

하지만 exteranal()를 통하여 internal()를 호출하면 트랜잭션이 적용이 안되는 것을 알 수 있다.

internal은 @Transactional이 있지만 트랜잭션이 적용 안되는 이유는
@Transactional를 사용하는 트랜잭션 AOP가 프록시를 사용하는데 프록시를 사용하면 메서드 내부 호출에 프록시를 적용할 수 없기 때문이다!!
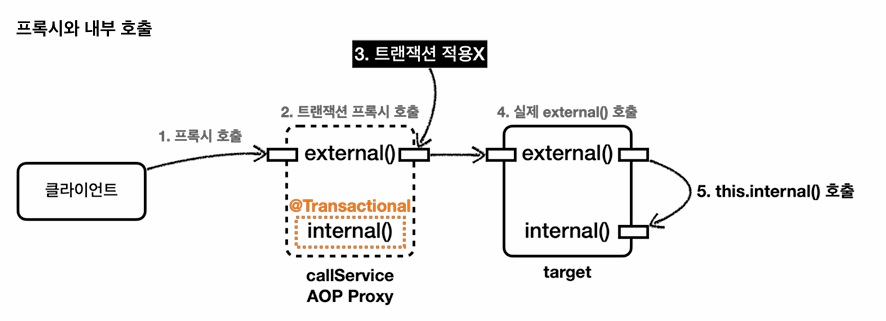
내부 호출에서는 트랜잭션이 적용된 프록시를 사용할 수 없으므로 internal()에서 트랜잭션이 적용되지 않는 상황이 나타나게 된다.
※ 프록시 내부호출 문제 해결법
프록시 내부 호출 문제를 해결하는 가장 간단한 방법은 @Transactional이 붙은 interanl() 메서드를 별도의 클래스로 분리하는 것이다.
<별도의 클래스로 분리한 코드>
@Slf4j
@SpringBootTest
public class InternalCallV2Test {

    @Autowired CallService callService;

    @Test
    void printProxy(){
        log.info("callService class={}", callService.getClass());
    }

    @Test
    void internalCallV2(){
        callService.external();
    }


    @TestConfiguration
    static class InternalCallV2TestConfig{
        @Bean
        CallService callService(){
            return new CallService(internalService());
        }

        @Bean
        InternalService internalService(){
            return new InternalService();
        }

    }


    @Slf4j
    @RequiredArgsConstructor
    static class CallService{

        private final InternalService internalService;

        public void external(){
            log.info("call external");
            printTxInfo();
            internalService.internal();
        }


        private void printTxInfo(){
            boolean txActive = TransactionSynchronizationManager.isActualTransactionActive();
            log.info("tx active={}", txActive);
            boolean readOnly = TransactionSynchronizationManager.isCurrentTransactionReadOnly();
            log.info("tx readOnly={}",readOnly);
        }

    }
    static class InternalService{
        @Transactional
        public void internal(){
            log.info("call internal");
            printTxInfo();
        }

        private void printTxInfo(){
            boolean txActive = TransactionSynchronizationManager.isActualTransactionActive();
            log.info("tx active={}", txActive);
            boolean readOnly = TransactionSynchronizationManager.isCurrentTransactionReadOnly();
            log.info("tx readOnly={}",readOnly);
        }
    }
}
이렇게 별도의 클래스로 분리하고 external()를 통해 internal()를 호출하면 트랜잭션이 적용되는 것을 확인할 수 있다.


internal()메서드를 별도의 클래스로 분리했을때의 과정은 다음과 같다.
1. 클라이언트가 callService.external()를 호출한다.
2. 이때 callService는 프록시가 아닌 실제 callService 객체 인스턴스이다.
3.callService에서 callService.interanl()를 호출한다.
4. 이때는 interService는 트랜잭션 프록시가 적용된다.
5.트랜잭션이 적용된 internal()메서드가 호출된다.
2. public 메서드만 트랜잭션 적용
스프링의 트랜잭션 AOP기능은 public 메서드에만 적용된다.
따라서 protected, private, package-visible에는 트랜잭션이 적용되지 않는다.
3. 초기화 시점에는트랜잭션 AOP가 적용되지 않음
     @PostConstruct
     @Transactional
	 public void initV1() {
		 	boolean isActive =
			TransactionSynchronizationManager.isActualTransactionActive();
            log.info("Hello init @PostConstruct tx active={}", isActive);
      }
<결과>
Hello init @PostConstruct tx active=false
@Transactional은 초기화 코드(@PostConstruect)와 함께 사용되면 트랜잭션 AOP가 적용되지 않는다.
이 경우 ApplicationReadyEvent 이벤트를 사용하여 해결할 수 있다.
@EventListener(value = ApplicationReadyEvent.class)
 @Transactional
 public void init2() {
    log.info("Hello init ApplicationReadyEvent");
 }
<결과>
TransactionInterceptor           : Getting transaction for [Hello.init2]
 ..ngtx.apply.InitTxTest$Hello    : Hello init ApplicationReadyEvent tx
active=true
 TransactionInterceptor           : Completing transaction for [Hello.init2]
로그를 통해 트랜잭션이 적용된 것을 확인할 수 있다.
추가 기능들
rollbackFor
- 언체크 예외인 RuntimeException, Error와 그 하위 예외 발생시 롤백
- 체크 예외인 Exception과 그 하위 예외들은 커밋
@Transactional(rollbackFor = Exception.class)와 같이 어떤 예외가 발생할 때 롤백할지를 지정할 수도 있다.
noRollbackFor
- 어떤 예외가 발생했을 때 롤백하면 안되는지를 지정
readOnly
- 트랜잭션의 기본값은 읽기와 쓰기가 모두 가능한 트랜잭션이 생성되지만 readOnly=true 옵션을 통해 읽기전용 트랜잭션 생성이 가능하다.
- readOnly를 통해 성능 최적화 가능
예외 발생시 커밋,롤백
스프링 트랜잭션 AOP는 예외의 종류에 따라 트랜잭션을 커밋하거나 롤백한다.
https://developerwoohyeon.tistory.com/189
예외
Error ==> 메모리 부족이나 심각한 시스템 오류와 같이 애플리케이션에서 복구 불가능한 시스템 예외이다.개발자는 이 예외를 catch나 Throwable로 잡으려고 해서는 안된다. 체크 예외(Exception), 언체
developerwoohyeon.tistory.com
스프링 트랜잭션 AOP의 예외 처리 기본 원칙
- 언체크 예외인 RuntimeException, Error와 그 하위 예외가 발생하면 트랜잭션을 롤백
- 체크 예외인 Exception과 그 하위 예외가 발생하면 커밋

언체크 예외의 경우 복구 불가능한 예외로 가정하기 때문에 롤백을 하는게 당연하지만,
체크 예외는 왜 예외임에도 불구하고 커밋을 하는걸까?
왜냐하면 체크예외는 비즈니스적인 상황 때문에 예외가 발생하는 경우이기 때문이다.
ex) 주문시 결제 잔고가 부족하면 주문 데이터를 저장하고, 결제 상태를 "대기"로 처리해야하는 경우